Documentation - Editing - Textures
- Applying textures
- The Textures Tool panel
- Texture variants
- Edit texture slot
- Replace texture
- Blend painting
- Keys
Textures cover the faces of a map’s cubes. Each one comes from a texture slot in the map’s list, and a variant of a slot changes how it is drawn: its scale, offset, rotation, colour and more. The Textures Tool panel picks, applies and edits them. Press F2 to enter or leave edit mode, and newmap gives an empty world to try things on.
Keys here are the default bind preset’s. Where the legacy preset differs, it is noted as “legacy”; see Bind presets. Texturing acts on the selection, so select some cubes first (see Selecting).
Applying textures
T: apply the texture picked in the Textures Tool panel to the selected side of the selection. LegacyY, andTstill works.Ctrl+T: apply it to every face of the selected cubes.Shift+T: get the texture of the selection, picking it in the Textures Tool panel. LegacyJ, andShift+Tstill works.I+ wheel: apply the map’s textures to the selection one after another, starting from the last one used. The Textures Tool panel picks each one as it goes. The same key in both presets.-: switch between texturing only the selected side and every face of the selected cubes (allfaces), the panel’s All cube faces.F8: recalculate the map’s geometry, normals, cubemaps and blending (calclight), which brings blendmap paint and normal maps up to date after editing. LegacyF4.
The texture under the selection is the one on the first solid cube in it, on the selected side.
The Textures Tool panel
F4 (legacy F1) opens it on the right, as does the toolbar’s Textures button.
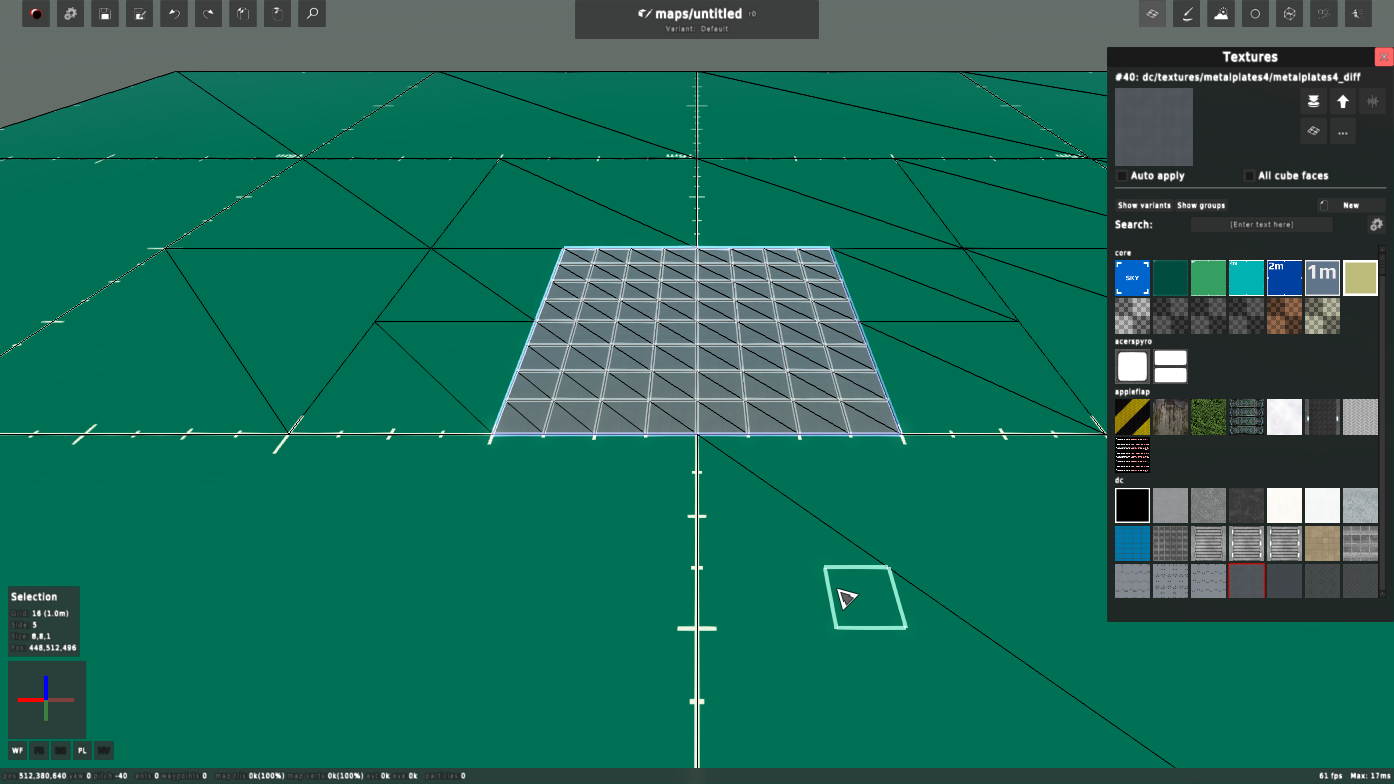
Picked texture
The top of the Tool panel shows the picked texture: its number and file, and a preview. When it is a variant, a smaller preview beside it shows the slot it comes from; click that to pick the slot instead.
The buttons beside the preview:
- Apply texture: apply the picked texture to the selection, as
Tdoes. - Get texture: pick the selection’s texture, as
Shift+Tdoes. - Toggle texture variant edit: show the variant settings of the selection’s texture in place of the texture list, and press again to go back.
- Edit texture: open Edit texture slot for the selection’s texture, or for the picked texture with nothing selected.
- More texture actions (
...): Replace textures, which opens Replace texture, and Cull textures, which removes every slot the map doesn’t use and tidies the faces hidden inside cubes. It can’t be undone.
Under them:
- Auto apply: clicking a texture in the list applies it at once, and variant settings apply as they change.
- All cube faces: texture every face of the selected cubes rather than only the selected side (
allfaces).
Texture list
Every texture slot of the map, grouped by where the textures come from. Hover one for its number and file.
- Click a texture to pick it; double click it to apply it.
- Show variants: list the map’s variants as well as its slots.
- Show groups: split the list into its groups, each under its name.
- New: add a slot with a placeholder texture to the map, in the group Custom, to set up with Edit slot.
- Search: show only the textures whose file names contain the text.
- The settings button next to the search: show the shader filter, whose buttons list only the textures that have all of the chosen features: B bump map, S specular, R reflective, G glow, P pulse, A alpha mask, Px parallax, T triplanar, D detail. The button turns orange while a filter is on.
Right click a texture, other than the sky (#0) and the default (#1), for its menu:
- Edit slot: open Edit texture slot for it.
- Clone slot: add a copy of the slot to the map. Not for variants.
- Remove slot: remove it from the map, and give the faces that had it the slot’s own texture, for a variant, or the default texture. Not for a slot that has variants.
- Cull from here: remove the slots the map doesn’t use, from this one to the end of the list.
- Cull group: remove the slots the map doesn’t use from this one’s group.
The menu isn’t available online, and removing and culling can’t be undone. Saving the map writes its slots to the map’s .cfg file.
Texture variants
A variant is a texture slot drawn differently, and a face can use one in place of the slot itself. Toggle texture variant edit shows the variant settings of the selection’s texture, which follow the selection as it moves. A change makes a variant with it, or reuses one that matches, and gives it to the selected faces (to every face of the selected cubes with All cube faces on). The settings are greyed out with nothing selected, and closing the Tool panel drops changes not yet applied.
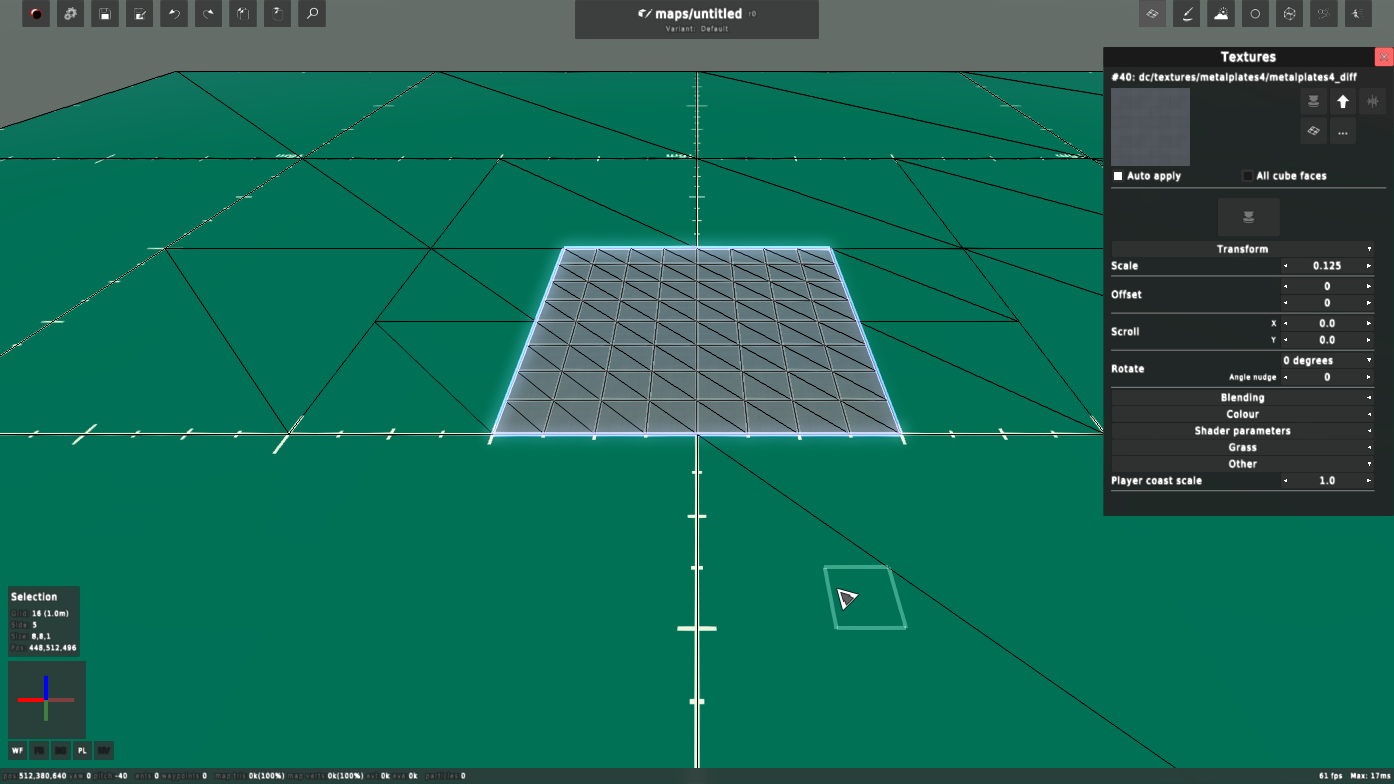
- Apply changes (the button at the top): apply the changed settings to the selection. It is greyed out while Auto apply applies them as they change.
- Right click a setting to copy, paste or reset it; reset takes it back to the slot’s own value.
- Each setting below is also a command, listed under Texture slots.
Transform
- Scale: the size of the texture on the faces, 0.125 to 8 times (
vscale). - Offset: shift the texture across the faces, in texture pixels, X and Y (
voffset). - Scroll X, Y: move the texture across the faces over time, in textures per second (
vscroll). - Rotate: turn the texture by quarter turns, or flip it (
vrotate). - Angle nudge: turn the texture by the angle of a slope this many eighths of a cube high, to line it up with faces pushed into slopes (
vangle).
Blending
- Layer: the blend layer, the texture the blendmap paints in over this one (
vlayer); see Blendmap. - Detail: the texture a triplanar detail shader draws on floors and ceilings.
Colour
- Colour: tint the texture, up to 10 times as bright (
vcolour). - Palette: colour the texture from a game palette instead (
vpalette).- Type: Pulse, Team, Weapon or World colours.
- Id: the colour from that palette.
- Enforce: show the palette colour whatever the game mode, such as team colours outside team games.
- Alpha Front, Back: how opaque the faces are inside the alpha material, those facing the camera and those facing away (
valpha). - Alpha refract: inside the alpha material, how much the faces bend what is seen through them (Strength) and the colour they tint it (
vrefract). - Alpha shadow: inside the alpha material, whether the faces cast a shadow (Enable shadow) and how dark (Strength) (
vshadow). - Touch texture: a texture shown where players and things touch this one, fading back after (
vtouchtex).- Fade: how long a touched tile takes to fade back; Off never shows it (
vtouchtexfade). - Touched by: what shows it, as bits: 1 live actors, 2 dead ones, 4 dropped items, 8 shots, or All (
vtouchtexby).
- Fade: how long a touched tile takes to fade back; Off never shows it (
Shader parameters
Only the settings the texture’s shader uses are shown (vshaderparam).
- Glow: the colour of the glow map.
- Pulse glow: the colour the glow pulses to.
- Pulse speed: how often the glow pulses, in Hz.
- Pulse offset: shift the pulse in time, 0 to 1.
- Gloss: how sharp the specular shine is, the opposite of roughness, 0 to 2.
- Specularity: how strong the specular shine is.
- Normal scale: how strong the normal map’s bumps are.
- Reflect min: the least reflection, seen even looking straight at the face.
- Reflect scale: the colour and strength of reflections.
- Triplanar bias X, Y, Z: how a triplanar texture blends between its sides and its top.
- Parallax Mul., Offset: the depth of the parallax effect and where it starts.
Grass
The variant’s grass. The slot’s own grass, which its variants start from, is set in Edit texture slot. Settings that show Usual, Map or Shape’s use the usual value, the map’s or the head shape’s.
- Colours:
- Grass: grow grass, from its root up in this colour (
vgrasscolourroot). - Middle, Tip: blend the grass to these colours at its middle and its tip, or keep the colour below.
- Grass: grow grass, from its root up in this colour (
- Blades:
- Shape: the shape around a blade, seen cut across it.
- Blend: how much of the grass is drawn.
- Density: blades per square unit.
- Height: the tallest the blades grow.
- Width: a blade’s width at its root, or each ribbon’s for a frond.
- Taper: how far a blade narrows to its tip.
- Ribbons: draw each blade as this many wavy ribbons, such as seaweed. They suit flat and crossed shapes.
- Waves, Swing, Ruffle, Ripple: how many waves run up a frond’s ribbons, how far they swing to each side, how much their width ruffles and how fast the waves move.
- Specular: the shine of the blades.
- Normal blend: how far blades are lit like the ground beneath them.
- Recovery: how long trampled grass takes to stand up again.
- Recovery hold: the share of that time it stays flat first.
- Elements: which elements scorch or wilt the blades: fire, energy, acid.
- Scorch hold, Scorch regrow: how long scorched or wilted grass stays that way, and how long it takes to recover.
- Shadows: the shadows blades cast for players who turn grass shadows on: Off, Static, or Animated with the wind.
- Stiffness: how far the blades resist leaning, the wind and trampling.
- Anim. interval, Anim. scale: the length of a gust of wind through the blades, and how far it bends them.
- Variation: how far clumps and blades stray from the grass colours.
- Patches, Patch size: how much the grass changes across the ground in broad patches, and how wide they are.
- Heads: Head 1, Head 2 and Head 3 each grow a kind of head among the grass, such as flowers, in the colour beside them, with:
- Shape: the kind of head.
- Accent: the colour of its second part, such as a flower’s centre, or the shape’s own.
- Share: the share of the blades that grow this head instead of grass.
- Size, Size variance: its size against the usual, and how much each may vary.
- Stiffness: how far it resists the wind and trampling.
- Stalk height, Stalk width, Stalk taper, Stalk shape: its stalk against the shape’s usual one.
The vgrass commands under Texture slots set each of these.
Other
- Player coast scale: how far players slide on the faces, higher being more slippery (
vcoastscale).
Edit texture slot
The slot itself: the image files the texture is made of, and the settings every variant of it starts from. Open it with Edit texture, with Edit slot in the texture list’s right click menu, or from the right click menu of any texture field.
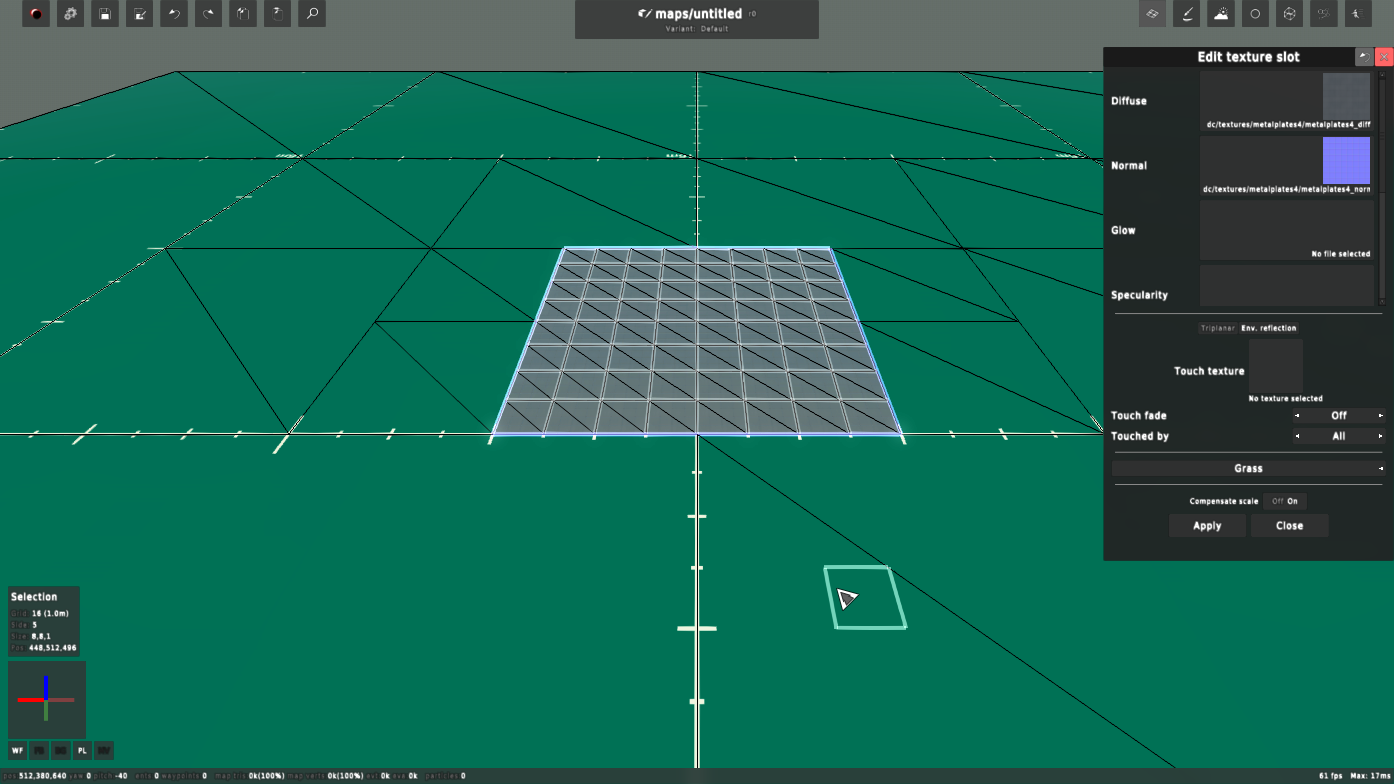
- Diffuse, Normal, Glow, Specularity, Height, Alpha, Displacement: the slot’s image for each, chosen from the game’s files. A field is greyed out when no shader takes it alongside the others.
- Specular from diffuse alpha: shown when the diffuse image has an alpha channel, to use it as the specular map.
- Height from normal map alpha: shown when the normal map has an alpha channel, to use it for parallax.
- Triplanar: draw the texture from three sides, so it doesn’t stretch on slopes.
- Env. reflection: reflect the surroundings with no reflection image.
- Specularity: give the texture a specular shine with no specular image.
- Pulse glow: make the glow map pulse.
- Touch texture, Touch fade, Touched by: as the variant’s, for the slot.
- Grass: the slot’s grass, with the same settings as the variant’s, which every variant of the slot starts from.
- Compensate scale: when the diffuse image changes size, rescale and shift the variants to keep the texture the same size on the faces.
- Apply: change the slot. The shader is chosen to match the images and switches given.
- Close: close without applying.
Replace texture
Replace textures, in the Textures Tool panel’s … menu, swaps one texture for another on every face that has it. Not available online.
- Limit to selection: replace only within the selection.
- Old texture: the texture to replace. Click it to choose from the list, or use the arrow button to take the selection’s.
- Swap: swap the old and new textures.
- New texture: the texture to put in its place, chosen the same way.
- Replace: replace it. This can’t be undone.
- Close: close the Tool panel.
Blend painting
The toolbar’s Blendmap paint button opens the Blendmap paint Tool panel, and P cycles the paint mode. Painting brings out each texture’s blend layer, set in Blending. See Blendmap.
Keys
| Key | Action |
|---|---|
F4 |
Textures Tool panel (legacy F1) |
T |
Apply the picked texture (legacy Y; T still works) |
Ctrl+T |
Apply the picked texture to every face of the selected cubes |
Shift+T |
Get the selection’s texture (legacy J; Shift+T still works) |
I + wheel |
Apply the map’s textures one after another, from the last used |
- |
Texture every face of the selected cubes, or only the selected side |
F8 |
Recalculate geometry, normals, cubemaps and blending (legacy F4) |
P |
Cycle the blend paint mode |
The keys of the texture actions can be changed in the Editor bindings Tool panel.